We have seen how Edje can be used to describe the location of interface parts in the application window. This is nice for static applications but EFL is all about motion. Edje allows you to describe animation for your user interface. And all this in a very natural way.
Let's compare the Edje way with the traditional one. This time we will examine the adventures of Mary Developer. Mary wants to create a simple animation for her latest application. A ball sprite which starts from the top-left corner of the window and goes all the way down to the bottom right. We choose this animation path because we assume that these are the positive directions of x and y axes of the application window. Mary wants the animation to last 5 seconds and present 20 frames per second for the transition. The canvas is a rectangle with x=300 and y=300.
Mary carefully studies the documentation of her graphic toolkit. She learns about timers and how to use them (and maybe a little about threads). She spends some time calculating some timing results and finally she crafts the following code:
Example 4.2. A simple animation (in C)
//Include files which contain implementation
//of linked lists or other data structures.
[...]
//Include files which contain timers
[...]

int main()
{
	Canvas *a_canvas;
	List *objects_to_be_drawn;
	timer *animation_timer;

	//Canvas is 300x300
	a_canvas=create_new_canvas(300,300);

	//Do not forget the paint function!
	//Setup a callback. VERY IMPORTANT
	set_paint_function_of_canvas(a_canvas,my_repaint);

	//We assume that ball.png is 10x10 pixels
	image=create_new_from_file("ball.png");
	set_coord_image(0,0);
	//Append the image to objects drawn by Canvas
	add_image(objects_to_be_drawn,image);

	show_canvas(canvas);
	repaint(canvas); //Here the my_repaint function is called.

	//Setup a timer to create animation
	//Schedule the timer to run every 50ms (20 frames per second=1000ms)
	animation_timer=timer_create(animate,50,image);

	//Continue with rest of the program
	[...]
}

//Function which smells X-Windows internals (what happens after an expose event)
void my_repaint(canvas *where)
{
	canvas_object *current;
	while(objects_to_be_drawn !=EMPTY)
	{
		current=get_next_object(objects_to_be_drawn);
		draw_object(where,current); //Finally each object is drawn.
	}
}

//The animation function which is controlled by a timer
//Return 0 if the timer is finished or 1 if
//it is to be rescheduled again
int animate(void *data)
{
	canvas_object *ball;
	int x;
	int y;

	ball=(canvas_object *)data;
	//Again let's say we know it is an image for simplicity
	x=get_image_x(ball);
	y=get_image_y(ball);

	//Advance coordinates by 3 to each direction
	//3 is found by dividing the canvas size (300) by total
	//number of frames we want to show (5 seconds * 20 frames each =100)
	//Therefore 300/100 =3
	x=x+3;
	y=y+3;

	//Update the new coordinates of the object
	set_coords_rect(ball,x,y);
	//Make sure that canvas is updated too
	repaint(canvas);

	//We need a check here to detect if the ball has reached
	//the bottom right corner. If yes the timer should be stopped.
	//One could also count the number of frames shown so far.
	//There are more elegant ways to deal with this.
	//The fact remains that a check should exist at one form or another.
	if(x==300 || y==300) return 0;

	//The ball has a long way to go.
	//Reschedule the timer
	return 1;
}
That is a lot of code for a simple animation. No wonder why most of today's application seem so static and motionless. Animation libraries do exist but they are only used in specific application domains (usually games). With Edje this is no longer true. Animation comes to the desktop!
Apart from the large size of the code above there is also another important problem. If you have ever coded like this you should see it right away. Mary wants the animation to last 5 seconds with 20 frames per second so she has to make calculations to find the number of total frames shown and the progress of the ball sprite. These values are currently hardcoded (the 50ms timer delay, and 3 pixel movement respectively). Theses values are only correct in the case of a 300x300 canvas (also hardcored). But what happens if the user resizes the application window? These values should be recalculated. Mary has to write additional code which automatically changes these values so that the animation is smooth no matter the size of the window.
All this becomes too complicated for a simple application and also forces the programmer to deal with canvas management more that she should. There has to be a better way. Actually there is and can already be found in most advanced 3D (and maybe 2D) animation/cad/modelling programs. If you have ever used one of them (Blender and Synfig are such open source applications for 3D and 2D respectively) you should already be familiar with this. The concept is called key framing in almost all (3D) animation suites. We would like to digress a bit at this point and mention a little history. You can always skip ahead if you want.
Before computing reached the masses, any kind of animation was a daunting task. The artist had to draw each frame separately. Having cinema quality (24 frames per second) animation meant that a single artist could produce only very short clips. More artists would be needed for longer films. People came up with two partial solutions. The first one was to lower the number of frames to 10 up to 15 (in best cases). This meant that the application was less smoother but less frames had to be drawn. This kind of animation can be even seen today in animation films destined to be shown on TV to young audiences. The second solution was to draw a small number of frames which had the backgrounds and focus the actual work on the parts of the screen that changed during animation (characters moving and talking). Of course this meant that full motion action was not an option. Japanese animation (a.k.a. Anime) has taken this concept to extremes featuring extremely detailed static backgrounds and blocky moving characters.
3D animation with the help of computers was a revolution. An artist could spend her time creating complex models of characters and places and then have the computer render the scene from different perspectives. Each frame was calculated from the computer. High quality animation became an option since the computer could render 30 or even 60 frames per second with no additional effort from the user. A single artist with a single workstation could create anything. In the case of professional studios with a team of artists and clusters of computers (render farms) high quality films would take over the movie and gaming industry in less than a decade. This happens because the user no longer defines frames but instead defines key positions and commands the computer to compute the animation between different keys.
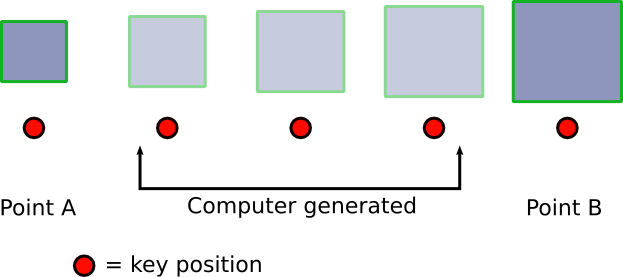
The concept works elegantly both in 3D and 2D. The user defines a starting point A for an object and selects some characteristics of the object to be recorded. Location of the object at this point is stored by the computer but other parameters such as size, rotation, color, textures and even shape can be recorded too. Then a second point B is defined where the object has different values on the recorded parameters. Finally the computer jumps in, creating automatically the middle frames changing the values in a relative way depending on the distance between point A and B. The result is a smooth transition as seen in the next figure. In the case of different shapes this is a very efficient way to create morphing, a technique commonly used in commercials, games and movies.
Edje implements this concept in 2D and allows the programmer to specify several key position for objects displayed on the canvas. Since Evas is a stateful canvas, as already mentioned in the previous chapter, it can compute automatically the frames in between and create smooth transitions between several states of the canvas.
Joe Programmer sees how Mary Developer struggles with her simple animation. He has become an experienced programmer in EFL since the last chapter so he offers to help Mary and introduces her to EFL. He listens to her requirements (20 fps and 5 second animation) and after some coding he presents her the following listings:
Example 4.3. The same simple animation in Edje
The C code of the program:

int main()
{
	//Code that creates a canvas and an Edje object
	//like any other object (text, image, rectangle e.t.c)
	[...]

	//Specify frames per second to 20
	edje_frametime_set(1.0/20.0);

	//Continue with rest of the program
	[...]
}

Inside the Edje description of the interface: (by now you know it is not C)

part
{
	name, "ball";
	type, IMAGE;
	description
	{
		state, "default" 0.0;
		rel1 {
			relative, 0.0 0.0;
			offset, 0 0;
		}
		rel2
		{
			relative, 0.05 0.05;
			offset, 0 0;
		}
		image
		{
			normal, "ball.png";
		}
	}
	description
	{
		state, "finish" 0.0;
		rel1 {
			relative, 0.95 0.95;
			offset, 0 0;
		}
		rel2
		{
			relative, 1.0 1.0;
			offset, 0 0;
		}
		image
		{
			normal, "ball.png";
		}
	}
}
program
{
	name, "animate_ball";
	signal, "show";
	action, STATE_SET "finish" 0.0;
	transition, LINEAR 5.0;
	target, "ball";
}
Notice the key positions. Point A is the state called default. This is the name Edje uses for the starting point of an interface element.
You cannot change this name. Point B is the state called finish which defines the ball sprite to be at the bottom right of the Canvas window.
Animation is accomplished by the program block which states that we want a linear transition lasting 5 seconds for the ball element
(defined by the target keyword) which changes the state to finish (defined by the action keyword).
We want this animation to be launched when the program loads and the canvas is shown (defined by the signal keyword).
Also notice the lack of extra calculations. Mary's requirement of a 5 second transition with 20fps is directly transfered to code. The number of frames shown and the delay between them is automatically calculated by Edje. No need for the programmer to worry about low level stuff. Finally notice the lack of any hardcoded values for sizes. The canvas can be anything and the ball sprite will be 5% of the canvas size. This means that no matter the size of the application window, Edje will adjust sizes, delays and frames to satisfy the requirements (20fps for 5 seconds). Extra code is not needed for that. The end result is that the user can resize the application in any way she likes and the animation quality will be preserved.
Edje is all about power. We stressed in the previous section that you can describe all elements of your interface in a relative way if you want.
If you don't want this, you can still revert to fixed size graphics. Let's assume that Mary likes Edje-based animations but she wants to keep the ball sprite to its
original size (10x10) no matter what. That is, the canvas can be any size, the animation will continue to last 5 seconds at 20fps but the ball sprite will have a fixed size.
This is where the offset keyword comes in. It allows you to describe sizes in pixels instead of percentages. Mary can rewrite the Edje description
of the interface as:
Example 4.4. The same simple animation in Edje (fixed size version)
part
{
	name, "ball";
	type, IMAGE;
	description
	{
		state, "default" 0.0;
		rel1 {
			relative, 0.0 0.0;
			offset, 0 0;
		}
		rel2
		{
			relative, 0.0 0.0;
			offset, 10 10;
		}
		image
		{
			normal, "ball.png";
		}
	}
	description
	{
		state, "finish" 0.0;
		rel1 {
			relative, 1.0 1.0;
			offset, -10 -10;
		}
		rel2
		{
			relative, 1.0 1.0;
			offset, 0 0;
		}
		image
		{
			normal, "ball.png";
		}
	}
}
program
{
	name, "animate_ball";
	signal, "show";
	action, STATE_SET "finish" 0.0;
	transition, LINEAR 5.0;
	target, "ball";
}
Remember that positive values on the x direction go rightwards and on y direction downwards. You should understand what the number 0.0,1.0,+10,-10 do.
The offset is a great way of course to create depressed buttons in your interfaces. They also allow you to fine-tune the size of your
interface elements if you do not like the relative approach.
What you saw so far was a trivial example of Edje animation. Here the only variable we recorded between the two states of the ball sprite was the location. But Edje allows you to record many more including size, color, text, alpha value, image e.t.c. Also you can have more than two states. You can create complex animation with multiple states acting as intermediate stations between the beginning and end of an animation. Edje also simplifies the creation of animations created by a big number of successive images (e.g. rotating logos). You can do many things in Edje! We have barely scratched the surface.
Last but not least we should mention that apart from the LINEAR transition, Edje also includes ACCELERATE, DECELERATE and
SINUSOIDAL transition effects.